Group policy was introduced with Windows 2000, and is an easy way of centralizing many Windows settings. In addition to centralizing event log and firewall settings, I personally like the ability to deploy MSI-based software applications with Group Policy, since it makes it extremely easy to deploy new software packages.
Even though Software Installation only works only with MSI-based packages, it does make deploying MSI-based software packages extremely easy.
We generally deploy software through Group Policy when three or more computers use it, since it's very easy to create a new package (if you already have a network share etc. setup, then you can literally do it in 2 minutes).

Before I list some of the useful WMI queries we use to target certain operating systems or computer types, there are a couple of things to note for those who are new to software deployment via group policy:
- Software packages are always installed right after a reboot, so they're mostly suitable for workstations.
- The network share which hosts the MSI files needs to give the computer accounts (e.g. DESKTOP1$) at least read access. Generally, giving EveryOne Read access works well unless you have a reason to restrict access to the software packages that you distribute.
Since the mechanism to distribute software is based on group policies, any sort of software package you create inside a group policy, will need to be assigned to an organizational unit (OU).
Since OUs can contain a large amount of computers that might not all need that particular software package, you can use two techniques to narrow down which computers receive the software:
- Security Filtering
- WMI Filtering
Security FilteringWith this method, you create a security group in Active Directory, place the computers that should get a particular software package into the group, and then specify this group in the
Security Filtering list.
The screen shot below shows a group policy that will only be applied to members of the "Source Control Computers" group:

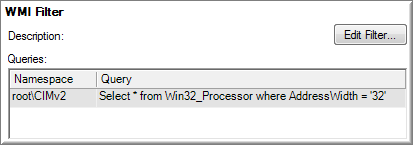
WMI Filtering
With this method, you can filter the computers which are affected by your policy, based on common properties of the Operating System. For example, some packages might distinguish between 32-bit and 64-bit, some packages might only work on Vista or later, whereas other packages apply only to servers. With WMI, you can target the right computers without having to mess with group memberships (though you will probably still need to do that). For example:
- 32-bit vs. 64-bit computers
- only workstations
- only computers running a certain OS
- only computers with a certain amount of RAM
- only computers of a certain brand
With WMI filtering, you just create the software group policy, for example:
- 7-Zip 32-bit
- 7-Zip 64-bit
and then apply the respective WMI filter to them. But lets cut to the chase, here are a few WMI queries that you can cut & paste:
Operating System 32-bit
Select * from Win32_Processor where AddressWidth = '32'
Operating System 64-bit
Select * from Win32_Processor where AddressWidth = '64'
Workstation
Select * from WIN32_OperatingSystem where ProductType=1
Domain Controller
Select * from WIN32_OperatingSystem where ProductType=2
Server
Select * from WIN32_OperatingSystem where ProductType=3
Some filters require multiple WMI queries, which are just chained together.
Workstation 32-bit
Select * from WIN32_OperatingSystem where ProductType=1
Select * from Win32_Processor where AddressWidth = '32'
Workstation 64-bit
Select * from WIN32_OperatingSystem where ProductType=1
Select * from Win32_Processor where AddressWidth = '64'

Windows XP
Select * from WIN32_OperatingSystem where Version='5.1.2600' and ProductType=1
Windows Vista
Select * from WIN32_OperatingSystem where Version='6.0.6002' and ProductType=1
Windows 7
Select * from WIN32_OperatingSystem where Version='6.1.7600' and ProductType=1
Windows 2003
Select * from WIN32_OperatingSystem where Version='5.2.3790' and ProductType>1
Windows 2008
Select * from WIN32_OperatingSystem where Version='6.0.6002' and ProductType>1
Windows 2008 R2
Select * from WIN32_OperatingSystem where Version='6.1.7600' and ProductType>1
WIN32_OperatingSystem of course includes more information that can be useful for WMI queries, such as a descriptive name of the installed OS ("Name") as well as the service pack installed ("ServicePackMajorVersion").
Manufacturer (e.g. DELL)
Select * from WIN32_ComputerSystem where Manufacturer = 'DELL'
Installed Memory (e.g. more than 1Gb)
Select * from WIN32_ComputerSystem where TotalPhysicalMemory >= 1073741824
For more information, check out these resources on WMI:
WMI
Secrets of Windows Management Instrumentation
Scriptomatic (Vista/Win2k8/Win7: run as administrator!)


